Ohio Game Fishing banner

Airbrush 101...getting started.

1 reading
26K views 38 replies 24 participants last post by  herbert  
#1 · (Edited)
I'd like to share what I know about airbrushes and airbrushing with those who might like to give tackle making a try.

Airbrushing is a way of painting with a spray pattern similar to what you've probably experienced with a can of "spray paint." The airbrush does the same thing, but it affords you a lot more control over where the paint goes and how much of it goes there...and that is all the difference in the world when it comes to how your project will look when complete.

The basics you'll need:
  • airbrush
  • compressor
  • regulator for the compressor (to control the air pressure)
  • paints

Lets start with the airbrush itself since this is what a lot of guys are most curious about and what a lot of questions focus upon.

An airbrush is either "gravity fed" or "siphon fed."
Gravity fed airbrushes usually have a cup on top in for the paint. The paint simply flows down through the cup into the airbrush and is blown onto the target surface.
Siphon fed airbrushes have a container which attaches to the bottom of the airbrush and the paint is pulled or "siphoned" out of the container and UP into the airbrush.
Generally siphon fed airbrushes require a little more airpressure because the paint is pulled up instead of being fed downward by gravity. For that reason, many users prefer gravity fed brushes. But siphon fed airbrushes do have their advantages. Some users like the idea that a bottle with paint attaches to the bottom of the brush and when you're ready to change colors, you simply remove the bottle, blow some solvent through the brush, and simply attach another bottle with the new color to the bottom of the airbrush. I prefer the gravity fed, but I've used both. I actually started with a siphon-fed Paasche airbrush.

Go ahead. Pull the trigger.
If you've look at airbrushes, you've noticed they have a trigger on top that you pull to make the paint come out.

Single action versus double action
There are two types...single action brushes with simple trigger that you pull and double-action, which you push down and pull back to operate. The double-action airbrush give you more control over the paint job. As you push down and pull back farther, you get more pressure and more paint. If you push down a little and pull back a little, you get less paint.

As you can see, the double-action gives you more control, but it will probably take a little more time for you to get used to the "push and pull back" operation. However, when you do, you're work will improve because controlling where the paint goes is what airbrushing is all about.

What size "needle?"

Airbrushes come with different size needles in them. The needle is pulled back out of the way, when you operate the trigger and the paint is allowed to flow out and onto the target.

A bigger needle (like "5 mm" allows more paint to be pushed out and it also allows you to spray thicker paints, such as pearls. A smaller needle (like 2 mm or 3mm) allows you to have more control because it sprays the paint out more sparingly.

Which one is "best?" Actually, its nice to have both, but if I could pick only one to start with, I'd probably buy the 5 mm. That will help you get the feel of things and later you can buy a brush that uses a smaller needle to allow you to paint finer details.

Three popular brands of airbrush:
Iwata
Badger
Paasche

Iwata is the most popular, but also the most expensive. It is a quality airbrush that will hold some of its value if you ever decide to sell it. It has great parts availability and offers a range of prices and models to choose from

Badger and Paasche are very popular also, but more affordable overall. I know a lot of guys who do outstanding work with those airbrushes.

More to follow...
 
#4 ·
I am looking seriously at getting into this for next winter. I am not ready to build baits, but my uncle and I have a vast collection of baits that have been retired due to chipped up paint, foil coming off, etc. I think I could doctor up some of these. So, I don't own anything on the list for supplies. What would be my ballpark investment for a compressor, regulaotor and airbrush? Can a compressor be bought with a regulator? Also, is a lot of space required for this stuff? I was thinking basement, but ours is kind of small. So, maybe half my garage would be used. I also hear you reference a furnace and/or drying wheel. Not sure I would want to get that involved if it wasn't absolutely necessary. Thanks for your advice and input on this stuff.
 
#5 · (Edited)
#8 · (Edited)
I'm glad that some of the others chimed in with info on the compressor question since I'm certainly not that familiar with all that is out there. I have a rather large one, although I do know that you can easily use a smaller one because not much pressure is required to operate an airbrush.

The regulator is almost a necessity since you have to turn the pressure down in order to control how much paint is pushed out of the airbrush onto the target you are painting.

It is also important to have a 'moisture trap' installed
between the compressor and the airbrush to keep moisture from getting blown through the airbrush and ruining the paint work. If your compressor does not have one, there are small units you can buy for less than $35 or so that attach right to the bottom of the airbrush and they work fine.

The regulators and moisture traps are usually sold wherever compressors are sold. Shop around.


Cost?
The airbrush will cost between $40 and go up from there. A good Iwata can cost around $150 to $200 and they have models that are more expensive if you really want to try to paint very fine details, but a good Iwata HP airbrush is really all most of us will need. I often hear of sales on airbrushes at Pat Catans and Hobby Lobby (but I never seem to get in on them!:confused::D) Note that Badger makes a number of airbrushes in the $70 to $100 range and I hear that they are more than comparable. I started with Iwatas and I've just kept buying them as time goes on.

The compressors can run from about $50 and go up from there. If you have a compressor now to pump up car tires or other household general purposes, its a good bet it will work for your airbrush stuff.

It is nice if you can segregate the compressor from your work area so that you don't have to contend with the noise while you're actually painting. I have my paint shop upstairs above my garage. I just ran the hose up through the floor and I almost can't hear the compressor when it kicks on. (Later I'll run the standard 'black' pipe from the compressor to the shop.)

As to a paint booth...
it depends on whether or not you're going to use enamels or where you're going to paint. Enamel paints definitely should be properly vented.

I prefer enamel paints for a number of reasons, but that is ONLY my personal preference. The water-base paints are most definitely safer because they are not flammable and the fumes are less toxic in general. The water-based paints should probably be used with some type of ventilation, but a lot of guys paint right in their basements and one builder that I know of paints with water-based paints right at his kitchen table (although if you're married and trying to paint in the kitchen, the fumes won't be the main hazard you'll need to be worried about:D).

As a matter of prudence, I do not recommend using any kind of paint without proper ventilation and/or a good quality respirator. I use a respirator at all times while painting. Even the particulate for water-based paints should NOT be inhaled.

Actually I started out painting outside in my garage at a card table. Of course, I could only paint during the day and as weather permitted. Eventually I built a small 8 foot by 8 foot paint shop.

I strongly recommend Createx paints overall.
Createx offers a great palette of colors and is readily available at a number of hobby stores and widely available online. A standard bottle of Createx is about $3 and that is enough for a number of even musky sized baits.

Before we go any further, I want to add a big fat disclaimer:
The building of baits involves the use of a number of hazardous materials including paints, epoxies, solvents, etc. It also entails the use of power tools and other dangerous tools and equipment. If you don't want to risk getting hurt, don't build lures. If you are not an adult, seek advice from an experience adult before even considering the use of these dangerous items. Additionally, I am not an 'expert' at this stuff. I do something else for a living as a matter of fact, so I'm just some guy having some fun in his spare time. You should seek the counsel of a local expert before using any of this stuff to see that you're doing it properly and follow all safety precautions, etc, etc.

That said, we'll talk a little about how to 'mix paints,' clean the airbrush, and so on. I'll be back again later.

(If you are one of those curious about getting started, please post any questions you might have so someone can help answer your questions. This forum has an excellent reputation for helping people get started on this rewarding hobby and if you ask, someone will usually make sure you get an answer.)
 
#9 ·
I am going to chime in with a couple of things that really helped me when I got started.

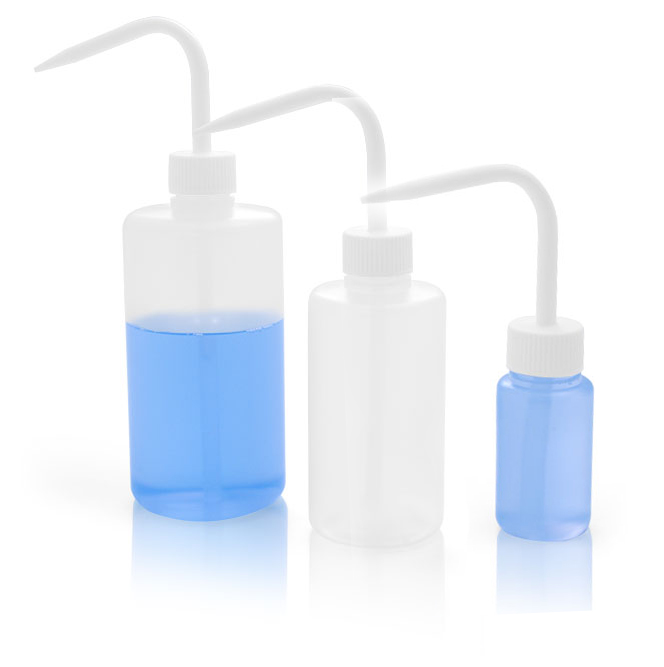
I know Vince touched on this, but it is imperative to keep your brush clean. Any dried paint on the needle, tip or anywhere inbetween will give you fits. Spatters, clogs, etc.....I keep three squeeze bottles handy when airbrushing....one is half and half windex and 90% isopropyl alcohol. One is 2 to 1 simple green and water and the other is straight distilled water. I use the windex and alcohol in color changes and the simple green for stubborn areas and the plain water to run through to make sure all the chemicals are gone when I put the brush away. Some of these chemicals, especially ammonia will eat the chrome from the inside of your paint cup and they become hard to clean....I clean them this way after every session and then about once a week I tear all my brushes down and clean them throughly from A to Z. I know this sounds like overkill but I promise you if you do this you will not have many problems.

Another thing I use and believe in is a lube on the needle and tip of the airbrush. It helps keep the needle from sticking, the trigger mechanism from sticking and helps keep the tip from drying out. The following is the type I use and it does not effect the paint. http://www.utrechtart.com/dsp_view_product.cfm?item=95061

Hope this helps.

Rod
 
#11 ·
I paint at my kitchentable :) I have a forgiving wife, and my kid is sound alseep while I am at it. I cover the nearby object with a, lets call it tarpaulin, so it collects the particles. I use a mask while painting.
I also lube the needle after each session, and feel that this saves the brush quite alot. I also have a couple of laboratory bottles.
Image

They produce quite a squirt, and I can get them more "in there". One with water and one with windex.

Michael
 
#12 · (Edited)
Great tip on the squeeze bottles, Pikopath!

Here's a look at a couple of the airbrushes I use:
Image

The top one is an Iwata HP-C. Its an oldie that I bought from my brother used. It has a 5mm needle in it and I use it for spraying heavier paints like pearls, etc. The larger needle allows for heavier, thicker paints to be sprayed, but to do so, you may need to crank up the air pressure a bit to throw that heavier paint. Makes sense, doesn't it?

(Note the tape on the handle. I have two Iwatas like this top one and the other one has a 3mm needle. I put the blue tape on the handle so I know which is the 3mm and which is the 5mm)

The bottom airbrush shown above is an Iwata Custom Micron Plus. It has a 2mm needle and a few other features, which I'll discuss later. The 2mm needle lets far less paint fly and that affords more control over any attempt to paint fine detailed work. Of course, the 2mm needle won't let you shoot thicker paints or pearls unless you thin them way down and sometimes even then, it won't allow it. Its a trade-off, as you can see.
=====================================================


Here's a shot of the HP-C with the handle removed so you can see where the needle is inserted:
Image

See that little knurled knob at the back of the airbrush (on the right side of the picture)? That is the knob you loosen to remove the needle. When you pull the trigger on the airbrush, it pulls the needle back from the tip of the airbrush and allows the air pressure to pull the paint from the cup and blow it out onto the target surface. Simple, right?

=========================================================

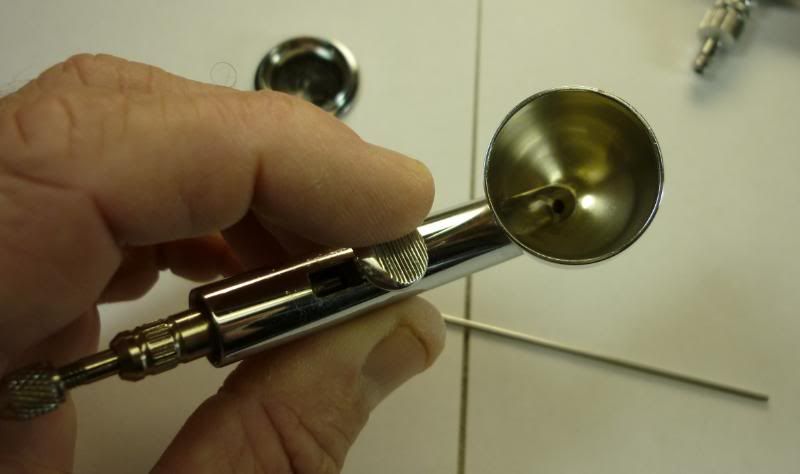
Here's a shot with the cap removed from the 'bowl' to show where the paint is placed to spray it:
Image

See the hole on the right side of the bowl in the bottom? The needle passes through there and sits against the "nozzle" opening on the front of the airbrush until you pull the trigger to paint.

========================================================

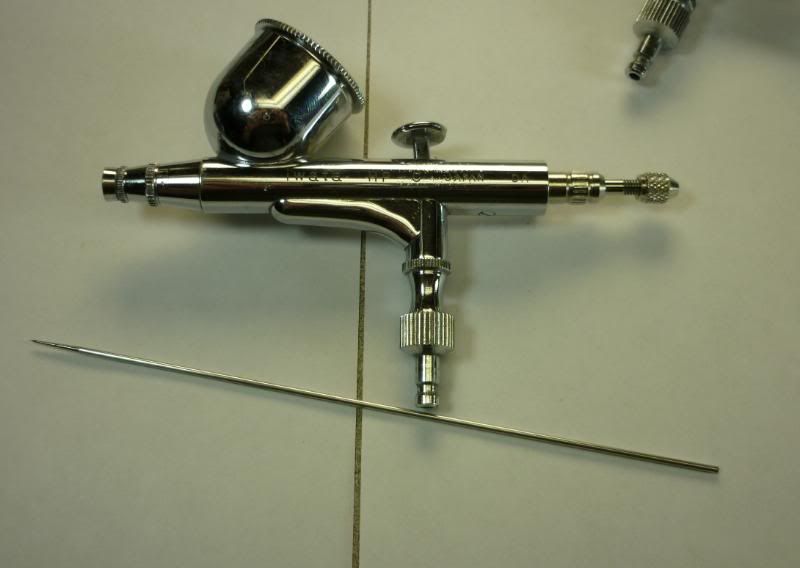
Here's a shot of the parts removed:
Image

These are the parts I usually remove to clean after every major painting session. The only other part I always remove to clean thoroughly is the nozzle which is that tiny little point on the very front of the airbrush (on the left side of the airbrush in this picture). That nozzle is removed with a little wrench that comes with the airbrush. You simply loosen it and unscrew it with your fingers. When you replace it DO NOT over tighten it. It is an extremely small part and will strip easily...which I learned the hard way. The part is also easy to drop and hard to find on the floor of my paint shop...l learned that the hard way too.:D

When you replace the nozzle, just 'finger tighten' it and then just barely snug it with the wrench. That's tight enough.

I throw the parts to be cleaned into a small, hard, plastic container with some solvent. For water based paints, a lot of guys use Windex for 'solvent' to clean the parts. For enamels I use lacquer thinner.

Next I simply shake the container with the lid on to clean the parts.

I then run a small fine brush through the airbrush with a bit of solvent to clean out the inside of the airbrush. Nothing to it.

Reassemble all the parts and you're good to go for the next paint session.

There are many opinions as to how to go about cleaning an airbrush. It is sort of like washing a car in that respect. This is my way. If you have a better way, stick to it.

======================================================

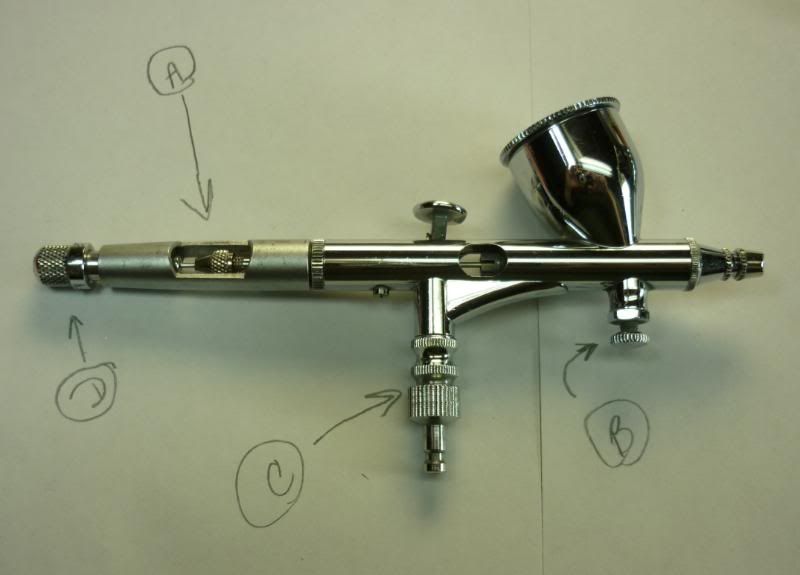
Here's a shot of the Iwata Custom Micron Plus:
Image

In addition to the 2mm needle, which affords the ability to paint finer details, the Custom Micron has a few other very nice features...
A = The device features a cutaway handle so you can pull that little knurled nob to pull the needle back if it is sticking for one reason or another. Sometimes during a paint session, you'll put the airbrush down for a relatively extended period. By pulling the needle back you break it free from the nozzle and you're ready to paint again. Yea, you can simply remove the handle if yours doesn't have a cutaway, but it is a nice feature none the less.

B = This is a small valve that lets you turn down the air pressure. You can do the same thing with the 'regulator' on your compressor, but this little thing, called a "Mac valve" allows very fine tuning of the air pressure. Iwata also makes one that you can buy separately...it attaches to the bottom of the handle and it does the same thing for any airbrush that has no Mac valve...I HIGHLY recommend it. The control of the air pressure is the second most important thing to good airbrushing in my opinion (the use of stencils to control where the paint goes is the first).

C = This is a device that you can buy and attach to any airbrush.
It is a 'quick connect' fitting and if you put them on all your airbrushes, you can change from one airbrush to another easily and fast. You know how that fitting pops off the air hose when you put air in your car tires? This works exactly the same way. You pull back on a sleeve on the air hose and the fitting pops right out along with the airbrush. Very slick and again, I highly recommend it if you have more than one airbrush...which you will after you become completely addicted to this maddening hobby...and you will become addicted.:smilingface (52):

D = This little knob can be back off or tightened up to control how far the needle is withdrawn when you pull the trigger. As you tighten it, you allow less and less paint to be shot out of the airbrush. Once you set it, you can relax and know that you cannot mistakenly pull the trigger back too far when you're trying to paint fine lines and small detail. Do you need it? No, boys and girls, you do not. But these features are like owning a cell phone. You'll wonder how you got by without them.

The Custom Micron is expensive, but it is a high quality precision device which will last for decades and retain a decent resale value if you ever want to sell it. It is not for everyone but neither are high end rods and reels, right?
It allows one to get closer to your maximum potential because of the control it affords.

I recommend the Iwata line of airbrushes without reservation. There is no shortage of quality parts availability and service connected with them. Other brushes may be just as good, but Iwata has a solid reputation which goes back for many, many years.
 
#14 ·
The gravity feeders generally need a bit less pressure to function, which usually mean a bit more control and less overspray problems.

Some suction feed airbrushes have small bottles that attach to the bottom of the airbrush to hold the paint. I know that some guys like this because changing bottles after blowing a bit of solvent through the brush is a bit faster than rinsing the bowl of the brush (on gravity fed models) each time.
 
#15 ·
Years back I went to Art School in Pittsburgh and everyone bought the cheap single piston air compressors that have no tank on them- You can still buy them for under $100.

Those things are LOUD and unreliable. They vibrate all over and frankly i wouldn't use one if someone gave me one.

I have done a fair share of airbrushing over the years but before I did some custom graphics on cars I bought a "Sil-Air" compressor from silentaire (see link below)
This thing is awesome and yes, it is expensive but if you airbrush as much as Vince or I used to- their worth every penny.

It has its own water filter and air filter and regulator and the wheels make it very convenient to wheel around in the garage.
I'm sure it will last me my whole life.

I think mine was close to 1K back 8-10 years ago. No idea what they cost now.

Don't bash the messenger- I'm just giving you other alternatives.

http://www.silentaire.com/silentaire/index.asp
 
#17 ·
Great thread Vince, it will be great to get this all in one place -

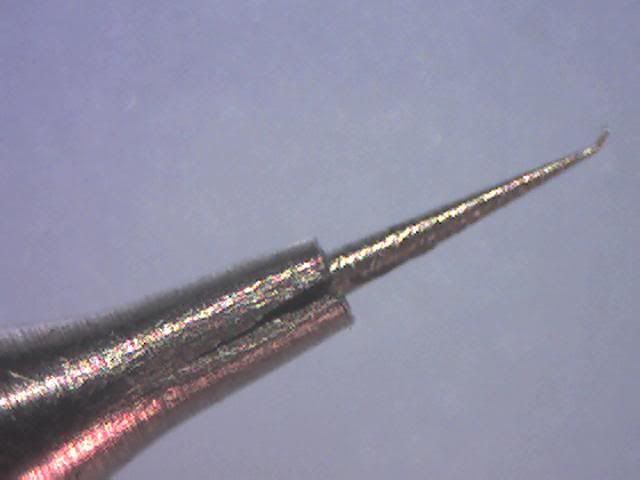
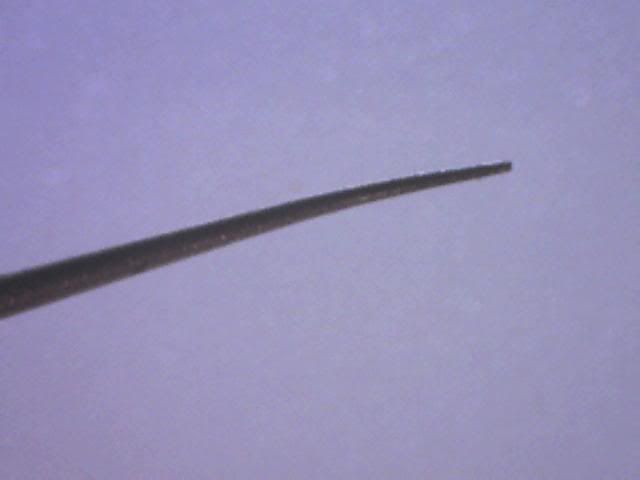
Just thought I would add a few pictures I took a few months back of bent needles and split tips, over the years these (for me) invisible faults have been the most mysterious and time consuming fixes you can come across.

Split Tip:
Image

These tip diameters are so small it's the last place we look to diagnose any faults, and usually I need a magnifying glass to see them.
In my experience a split tip is usually caused when the brush is dropped and lands on its rear end when the handle has been removed to clean the brush, the impact with the floor/bench can drive the needle through the tip with the 'wedge' shaped taper of the needle splitting it – the symptom is usually an intermittent high and low (or none) paint flow as pressure builds up behind the needle, then leaks past through the crack in the tip, also paint will spray to one side rather then a uniform cone (similar to a dirty tip/needle).

Bent Needles:
Image


Image


Image

These needles are all .2 and .3mm, all bent by being too casual when cleaning, usually done when a cloth gets caught on the fine point protruding from the tip and the cloth is dragged across it, or it hooks on your shirt !!!- Like the split tip this is also hard to detect and you will need a magnifying glass again, sometimes even with one it is hard to see, so roll it between your fingers while looking at it and if it is bent you will see the tip wobbling. Major symptom is spatter and out of shape spray cone (sprays to one side), another is sprays ok then a blob appears on your pride and joy, this is caused when the paint slowly builds up on the bent needle point and is eventually blown off , splat.!! ****
As you can see from the pictures, there are needles and needles, some with a nice fine polished taper and some with what can only be called a ground taper and round point. Do your brush and yourself a favour and polish them, even if they are new new, the difference is amazing but watch out you don't stab yourself with them, they go in like a fish hook – fine point, fine lines.

Bad Taper (not conical):
Image


Sorry for the quality of the pictures, they were shot through a microscope, taken at 10 power and 60 power with a mediocre camera. pete
 
#18 ·
Great thread Vince and superb info left by others as well.I have already learned the best approach is practice,practice and than practice some more.You learn something new just by going outside the box and trying all kinds of things.Feathers,netting,straws,brush bristles,you name it ,all kinds of new patterns emerge with your imagination being the only limit.You've helped a lot Vince and we all appreciate your sharing your expertise with us.I also second your choice of brushes Iwata, if you can afford it,you can't go wrong,I am well pleased with mine.
 
#22 ·
I have a question about the minimum colors of paint I need to get started. Earlier vc1111 had said that I could buy a limited number of colors and mix them to get started. Besides basecoat can I start with createx pearl red, blue, yellow, silver, gold and black and mix them? I have read multiple comments about mixing pearls so I wanted to be sure. Can you make a good firetiger or clown pattern with pearls or do you need opaque paints when doing a pattern like that.
 
#26 ·
Was painting a bait and the brush popped out of the stand after me kicking the hose and dropped to my carpet in my room. No problem though, wrong. I took it apart after it started spittin paint and the needle had just a minute bend only seen with the aid of a magifying glass. No problem i will just get a new needle. wrong. The nozzle split at the end too and thats a whole nother problem. Mine is a Iwata HP-C. Anyone have a nozzle laying around for any of these. A,B,C,SB are the same. Thanks
 

Attachments